Electroplating 3D Prints – All You Need to Know
- 列印專門店 瑞思3D
- Nov 30, 2024
- 3 min read
Published Jun 7, 2023 by Nick Loth

Want to coat your 3D prints in metal to boost their look and strength, it's possible with electroplating. Learn how!
Electroplating is a finishing process to coat objects with a thin metal layer. You’ve likely heard of gold-plated jewelry, which is far less expensive than solid gold jewelry, but has a nearly identical appearance.
You can coat metal with another metal and coat polymers with metals; in fact, anything that is electronically conductive can be electroplated. This includes your plastic 3D prints, enabling you to improve not only your part’s appearance but also its strength and durability without having to go down the much more expensive metal 3D printing path.
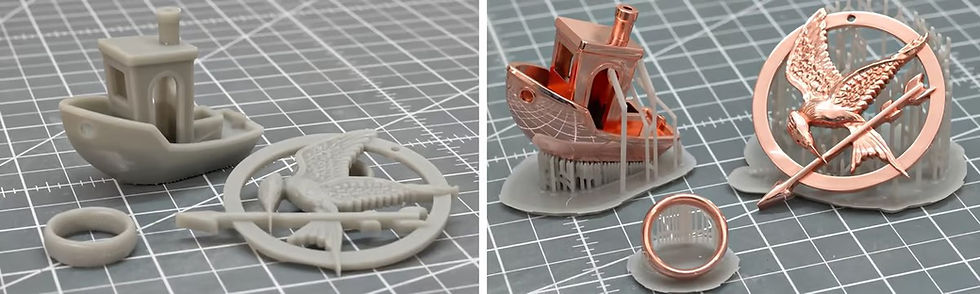
Electroplating is a cost-effective alternative for many applications and fills a gap in mechanical properties between plastic and metal 3D printed parts that even NASA is exploring for future space applications.
Contrary to popular belief, electroplating is nothing like spray painting or dipping parts in a metal slurry; it’s a chemical process with electricity, which can be done at home or in a lab but is most often carried out at a manufacturing facility.
Electroplating 3D Prints
Understanding Electroplating

Electroplating uses controlled electrolysis to achieve the electrodeposition of metal cations from the positively charged stock material (anode) to the negatively charged substrate (cathode). In other words and overly simplified: When you put your 3D printed object in an electrolyte solution with the metal you want to use as a coating and apply electricity, bits of the metal will flow through the solution and stick to your 3D printed part. Let’s look at this a little closer.
When an electronic charge is introduced, positively charged ions (cations) dissolute via oxidation and follow the electrical current to deposit a metal layer onto the part. The most common metals used for electroplating are copper, nickel, gold, silver, palladium, tin, zinc, and chromium.
If applied to weaker plastic materials, these metals can give the final part improved mechanical properties like tensile modulus and ultimate tensile strength, albeit not nearly as good as fully metal 3D printed parts. Electroplated objects can therefore be regarded as a midpoint between plastic and metal 3D prints, where electroplating can as much as double the ultimate strength of a resin 3D printed part.

The three main methods of tank electroplating are barrel, rack, and reel plating. Barrel plating tumbles the substrate in a barrel to facilitate a uniform coating. Since many parts can be placed in the barrel, it’s useful for high-volume production. Rack plating secures the pieces on a rack. This method is used for complex or delicate parts unsuitable for barrel tumbling. The rack plating method also comes closest to DIY electroplating as the desired part is fixed in place with a wire. The last process, reel plating, is ideal for plating a particular substrate area. It is economical when plating high-volume jobs and efficient due to its high plating rate.
Each process happens while submerged in a conductive electrolyte solution that usually contains salts of the metal you want to plate, sulfuric acid, and solvents alongside other additives like acids, bases, or brighteners. Handle the solution with great care, as it is highly corrosive. Always wear the appropriate personal protective equipment like gloves and safety goggles, and never pour your spent electrolyte down the drain but dispose of it at the appropriate collection site!
Remember that electroplating is a balancing act of depositing metal to your part, with the current and the electrolyte eating the coating you just applied away. Plating success depends on various factors, the most important being exposure length, part geometry, and electrical current strength. Electroforming also makes multi-material, selective coating of a part possible, which improves functionality and saves material costs if it only needs to be conductive in certain areas.

The 3D printed part needs to be conductive to ensure the flow of the metal cations from the positive to the negative pole. Non-conductive plastic prints must therefore be appropriately set up to ensure plating success. How exactly this can be done will be explained next.
Source: all3dp
Comments